TELESCOPES, CAMERAS, AND TECHNIQUES
Over the nearly two decades I have been doing astrophotography I have owned six telescopes, but not at the same time! The telescope that is responsible for the majority of images on this website is an 11-inch Celestron NexStar GPS yoke-mounted instrument that I owned for 17 years, a workhorse if there ever was one! Located in the outskirts of Santa Barbara, CA, I had reasonably dark skies but had to contend throughout the year with the unpredictable intrusion of the low-level marine layer clouds and associated unsteady air.
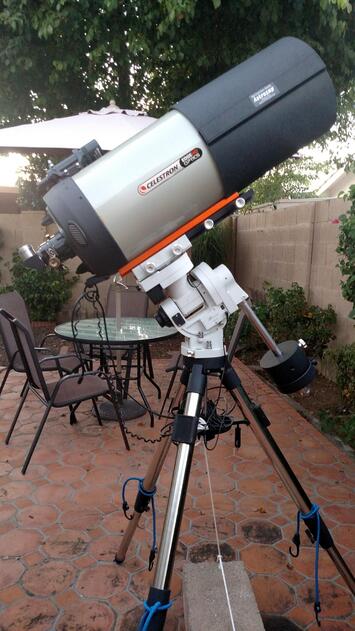
In 2018 we moved from Santa Barbara to Scottsdale, AZ, living in our vacation home there. That year I donated my aging scope to a friend in the local astronomy club (Santa Barbara Astronomical Unit) who put it on a new mounting, giving it new life. For use when at our vacation home I had purchased a 9.25-inch Celestron Edge scope on a new, sturdy equatorial mounting (more on mountings below). Once we made the decision to move to AZ permanently I decided to sell that scope and replace it with a new 11-inch Celestron Edge, shown on the left, which is the scope responsible for all the recent images on the Home Section and will be the scope most often used in my future astrophotography efforts.
I am frequently asked by people how the observing conditions compare in Scottsdale to Santa Barbara. There are pluses and minuses. The biggest downside for Scottsdale is the light pollution caused by the city and metropolitan Phoenix. The upside is that in Scottsdale there are many more predictably clear nights with good "seeing" conditions, meaning that the upper air currents are reasonably steady so images in the telescope do not dance and blur thus producing much better chances for getting sharp images.
For those of you interested in going deeper into astrophotography, please read on. Those who are not, please move on to the Astrophotos section.
Telescope selection
There are a bewildering number of telescopes on the market, very different from when I was first getting into astronomy! There are many things to consider before investing in a telescope:
1. Buy from a reputable manufacturer. Do not be taken in by cheaply built telescopes known as "hobby killers" because they work so poorly that the owners give up in total frustration trying to get them to perform adequately. Manufacturers of reputable and affordable instruments include Celestron, Meade, iOptron, Orion, TeleVue, and Stellarvue among others.
2. In addition to getting a telescope with great optics, you must pay attention to the mounting. Only equatorial mountings are suitable for long exposure astrophotography. (If you just intend to image the moon and planets an alt-azimuth mounting would work.) The mounting must track smoothly, resist vibration, and be able to follow stars with no trailing of images for several minutes. If it is a computerized Go-To mounting it must be consistently accurate in locating objects. Truly long exposures involving a series of shorter exposures over a period of 30 or more minutes usually require a guide telescope and guidance program that will correct the telescope drive and eliminate tracking errors.
3. Reflecting or refracting telescope? Refracting telescopes, with an objective lens in the front, are always more expensive per inch of aperture (diameter of the lens or mirror) than reflecting telescopes because they require more time-consuming work to perfect at least four surfaces on the objective lens, whereas most reflecting telescopes require far less time-consuming optical configuration. Thus, reflectors tend to be the overwhelming favorites of amateurs. But refractors are noted for excellent contrast when observing planets.
4. Buy the most expensive telescope and mounting you can afford once you know what you want. You'll not regret having quality, but lack of it can be a constant source of irritation. Get the best you can!
5. Do your homework! Before you purchase, research books and articles on telescopes, mountings, and astrophotography. You can make use of some of the resources suggested in the Personal and Resources section of the website. Local amateur astronomers are another great resource. You can find them at any astronomy club. Also, many astronomy retailers have very helpful associates who can give you valuable advice and input.
Cameras
As with telescopes there is also a plethora of cameras on the market, and most of the good ones are expensive. Here are a few tips to consider:
1. If you already own a DSLR camera chances are it can be mated to your telescope fairly easily so you can use it rather than laying out a sum of money for a specialized astrophotography camera. Most of my astrophotos were done using an unmodified (but often combined with filters) version of the Canon Rebel series DSLR cameras. Nowadays Nikon DSLR cameras are equally good for astrophotography (the earlier models had trouble accurately reproducing brighter star images). There are also "mirror-less" digital cameras that can work well.
2. Cameras specialized for astrophotography are color or black and white, the latter utilizing color filters to produce the final color image. In addition, they have a built-in cooling function to reduce electronic "noise" generated by their CCD or CMOS image detectors. There is a wide range in cost and sophistication. Since these cameras are quite expensive it is very worthwhile to research their pros and cons.
3. Recently Atik has introduced a novel astrophotography approach that stacks many short exposure images in real time while the telescope is actually viewing an object. An image is "developed" on a laptop screen, which is fascinating to watch. The image can then be saved and processed further. Both their Infinity and Horizon cameras (used in Recent Images in the Home Section) work with the Infinity image stacking system to create an image that could only be seen with such clarity through the eyepiece of a much larger telescope. Thus, these cameras serve to greatly augment viewing of dim objects in a small telescope and at the same time allow a choice for saving the image for further processing. It is a breakthrough technology, and both cameras are recommended for those just getting into astrophotography. Another important advantage of these cameras is that no guiding telescope or program is needed if your telescope mounting is accurately polar aligned and tracks smoothly. The algorithms of the stacking software keep everything aligned as images stack!
4. Also, there are some excellent high-resolution video cameras (for instance, ZWO) that, combined with the program RegiStax 6, create great images of the planets and Moon.
5. For those of you who are already experienced photographers, think of the telescope as a giant telephoto lens! It has the same characteristics as a regular telephoto lens when it comes to focal ratio, field of view (FOV), exposure times, and resolution. For instance, a telescope operating at F/4 will image a faint galaxy many times more quickly than a telescope operating at F/10, but the resolution will be less. One of the advantages of the Celestron Schmidt-Cassegrain telescopes (as is my 11-inch Edge scope) is that they are capable of performing well using multiple focal ratios. So with the appropriate accessories, one can choose the focal ratio (F/2 to F/30) most suitable to the object being photographed. This flexibility is not present in many telescopes.
Processing
Processing refers to what takes place after images have been downloaded from the camera into a computer. Images from any camera used for astrophotography can be greatly improved through being stacked, and then the stacked photo can be adjusted in terms of contrast, sharpness, color, etc., to produce a pleasing final photograph. There are many programs available to enhance this process such as Deep-Sky Stacker, Photoshop and Photoshop Elements, and PixInsight. The last program is the most comprehensive and complex processing program for astrophotography. It is often referred to as the "Photoshop of astrophotography."
* * *
Remember, that to become a good astrophotographer takes time and patience. In that respect it is no different from mastering any fairly complicated skill. However, don't wait forever to make your first photograph! Nothing takes the place of hands on and trial and error learning. As your work improves you'll have a great sense of satisfaction and accomplishment. And, you'll be able to share your work with others.